
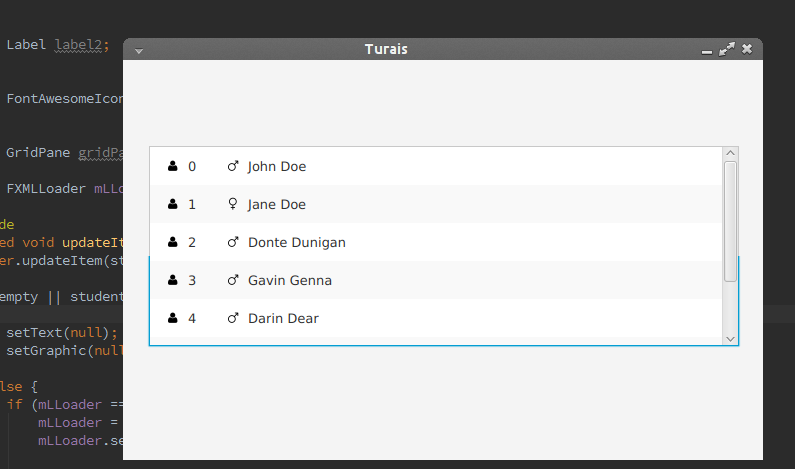
In this Blog post I'll show you how to implement an custom ListView in JavaFX like the one below:

SOME PRE WORK
First, we need some Data. So I came up with a student class.
public class Student {

    private static int studentIdAct = 0;
    private int studentId;
    private String name;
    private GENDER gender;

    enum GENDER {
        MALE,
        FEMALE
    }
//... you get the idea
A JavaFX Application always consists out of a main class which extends Application.
public class Main extends Application {

    @Override
    public void start(Stage primaryStage) throws Exception{
        Parent root = FXMLLoader.load(getClass().getResource("/fxml/Main.fxml"));
        primaryStage.setTitle("Turais");
        primaryStage.setScene(new Scene(root, 640, 400));
        primaryStage.show();

    }


    public static void main(String[] args) {
        launch(args);
    }
In this class, the Main.fxml file is loaded. In our Main.fxml I defined a controller class for our Main.fxml.
public class Controller implements Initializable {

    @FXML
    private ListView<Student> listView;

    private ObservableList<Student> studentObservableList;

    public Controller()  {

        studentObservableList = FXCollections.observableArrayList();

        //add some Students
        studentObservableList.addAll(
                new Student("John Doe", Student.GENDER.MALE),
                new Student("Jane Doe", Student.GENDER.FEMALE),
                new Student("Donte Dunigan", Student.GENDER.MALE),
                new Student("Gavin Genna", Student.GENDER.MALE),
                new Student("Darin Dear", Student.GENDER.MALE),
                new Student("Pura Petty", Student.GENDER.FEMALE),
                new Student("Herma Hines", Student.GENDER.FEMALE)
        );


    }

    @Override
    public void initialize(URL location, ResourceBundle resources) {
        listView.setItems(studentObservableList);
        listView.setCellFactory(studentListView -> new StudentListViewCell());


    }
When you hop into the Main.fxml file you'll see that I've created an ListView in FXML and gave it the fx:id listview. I add all the Students to an ObservableList, so when changes in that list occur, they get updated to the ListView.
My controller class implements Initalizable, the method initialize is called after its root element has been completely loaded.
Set the ListCell to our ListView
Now, in my initalize method you see that I set the LisViews cell factory. In this example I do this with an lambda expression, but of course you can do it the old way.
The old way would be something like this:
listView.setCellFactory(new Callback<ListView<Student>, ListCell<Student>>() {
    @Override
    public ListCell<Student> call(ListView<Student> studentListView) {
        return new StudentListViewCell();
    }
});
Our custom StudentListViewCell
Fist of all you have to design your new ListCell. You can do this in SceneBuilder.
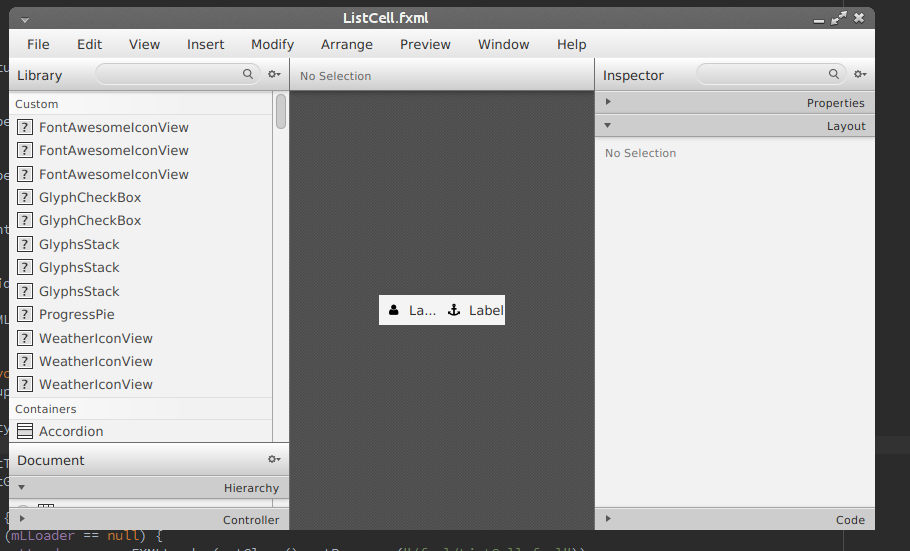
Our custom StudentListViewCell has to extend ListCell<Student>
In this class we also load an FXML file with our well known FXMLLoader.
First we need to declare all the FXML Items we added in our custom cell.
    @FXML
    private Label label1;

    @FXML
    private Label label2;

    @FXML
    private FontAwesomeIconView fxIconGender;

    @FXML
    private GridPane gridPane;
Then we have to override the updateItem method.
    @Override
    protected void updateItem(Student student, boolean empty) {
        super.updateItem(student, empty);

        if(empty || student == null) {

            setText(null);
            setGraphic(null);

        } else {
            if (mLLoader == null) {
                mLLoader = new FXMLLoader(getClass().getResource("/fxml/ListCell.fxml"));
                mLLoader.setController(this);

                try {
                    mLLoader.load();
                } catch (IOException e) {
                    e.printStackTrace();
                }

            }

            label1.setText(String.valueOf(student.getStudentId()));
            label2.setText(student.getName());

            if(student.getGender().equals(Student.GENDER.MALE)) {
                fxIconGender.setIcon(FontAwesomeIcon.MARS);
            } else if(student.getGender().equals(Student.GENDER.FEMALE)) {
                fxIconGender.setIcon(FontAwesomeIcon.VENUS);
            } else {
                fxIconGender.setIcon(FontAwesomeIcon.GENDERLESS);
            }

            setText(null);
            setGraphic(gridPane);
        }

    }
And that's it ;)
Well now I explain what happens here.
First, the updateItem method is called for every visible item in our listview. So you don't want much code in here, because if you scroll fast in your listview it could produce some lags.
So we only want something to happen if we have an student and if our cell is not empty.
if(empty || student == null) {

            setText(null);
            setGraphic(null);

        } else { //all the other code goes in the else block

             //...
        }
Then we have to load our custom fxml list cell.
if (mLLoader == null) {
    mLLoader = new FXMLLoader(getClass().getResource("/fxml/ListCell.fxml"));
    mLLoader.setController(this);

    try {
        mLLoader.load();
    } catch (IOException e) {
        e.printStackTrace();
    }

}
First we check if we don't have an FXMLLoader. If we don't have one we load our custom cell, and set this class to our controller class for the cell.
After the cell has been loaded, we can do some simple logic in our ListCell. In my example I set the first label to the student id, the second label to the student name, and then I set the icon in my cell to the students gender.
label1.setText(String.valueOf(student.getStudentId()));
label2.setText(student.getName());

if(student.getGender().equals(Student.GENDER.MALE)) {
    fxIconGender.setIcon(FontAwesomeIcon.MARS);
} else if(student.getGender().equals(Student.GENDER.FEMALE)) {
    fxIconGender.setIcon(FontAwesomeIcon.VENUS);
} else {
    fxIconGender.setIcon(FontAwesomeIcon.GENDERLESS);
}

setText(null);
setGraphic(gridPane);
At the end we have to set the text to null and set our GridPane as the Graphic.
Of course you could use everything else, for example an AnchorPane or something similar.
The code is available at GitHub - TuraisJavaFxExamples.
If you press this Button it will Load Disqus-Comments. More on Disqus Privacy: Link